Thursday, February 08, 2018

Java 8 : Functions

Functional programming in Java, a useful feature was introduced with Java 8 (java.util.function package).

With that, we have the ability to define a function, pass functions to a method as arguments or use already defined methods as functions.

I'll use a simple example to explain a function.


Function  myFunction = n -> n * n
 
I have defined a function here, named as "myFunction". It takes an argument of type Integer and returns an Integer (the square of the number passed in).

We can pass this function to other methods as an argument. The method below takes in a function and an integer, then calls function's apply method with the passed in integer. That applies function to the integer.

public int myMethod(Function func, Integer number) {
    return func.apply(number)
}
 
If we call above method with number 5 like below, we'll get 25 in return.
 
int answer = myMethod(myFunction, 5);

Also we are able to use already defined methods as functions. As an example, if we have following method implemented in myClass,


public class MyClass {
  public Integer calculateSquare(Integer number) {
    return number * number;
  }
}
 
then we can define a function like this that will act similar to myFunction.

Function func = MyClass::calculateSquare;
  
You can find all sorts of functions that you can define in this link. I only used one kind (Function : Represents a function that accepts one argument and produces a result) in the example.

Saturday, August 13, 2011

NSIS - How to Write the Uninstaller

If you know how to create an installer using NSIS, you'll probably want to know how to create the uninstaller too :)

So you have to write a section named "Uninstall" inside your .nsi script file.

section "Uninstall"  
  SetShellVarContext all
  Delete "$DESKTOP\Your Application.lnk"
  RMDir /r "$SMPROGRAMS\YourApp"
  RMDir /r "$INSTDIR"
  Delete $INSTDIR\uninstall.exe
  DeleteRegKey HKLM "Software\Microsoft\Windows\CurrentVersion\Uninstall\YourApp"
  
sectionEnd

In line 2 it sets ShellVarContext to all (all user's shell folder will be used). If not the default is current user's shell folder.  Next line deletes the desktop shortcut. Next 3 lines delete the installation folders. If you entered any registry keys during the installation then you can delete them here (line 7).

While having this "Uninstall" section in  your nsis script, you have to invoke it from your "Install" section. Then only the installation will write the uninstaller.   Here is a possible association of a installer section to the above uninstaller section.

Section "GENERAL"

  SetShellVarContext all
  #Installer body---------(creating desktop/start menu short cuts, granting permissions, etc)
  
  #Writing registry keys
  WriteRegStr HKLM "Software\Microsoft\Windows\CurrentVersion\Uninstall\YourApp" "DisplayName" "Your Application"
  WriteRegStr HKLM "Software\Microsoft\Windows\CurrentVersion\Uninstall\YourApp" "UninstallString" "$INSTDIR\uninstall.exe"

  # create the uninstaller
  writeUninstaller "$INSTDIR\uninstall.exe"

SectionEnd


Friday, July 15, 2011

NSIS - How to Embed Other Installers in Your Installer

Sometimes you may want to embed some other installer in your installer. As an example if you need Java as a prerequisite then you can embed Java installation inside your installer. Then it will run the Java installation before installing your application, when you run your installer. 

So let's write a section to embed JRE installer in your installer
Section "jre" SECJRE
  File "jre-6u14-windows-i586.exe"

  DetailPrint "Starting the JRE installation"   
  ExecWait "$TEMP\jre-6u14-windows-i586.exe" 
SectionEnd

In line 2 it is checking the existence of the file "jre-6u14-windows-i586.exe". At the point of compiling NSIS script, this exe should exist in the stated relative path (in this case it should be inside the same folder as the nsis script file). In line 5 it will execute the jre installer and your installation program will be suspended until JRE installation is completed. After the JRE setup is complete it will resume the installation of your application. In this way, you can embed any number of installers inside your installer.

This can be improved in many ways. Well, before installing JRE, you can check whether JRE is already installed in the system. In that case you can consider the version too. If it is not installed then you can use the above script to install JRE. Another improvement is, instead of installing a precise JRE you can download the latest version from Internet and then install. This nsis example shows a similar thing.

Thursday, April 28, 2011

NSIS - How to Detect Whether Java is Installed in the System

While writing my installer I wanted to install JRE (embed JRE installer in my installer) only if Java is not installed already. So I had to detect whether Java is already installed.

My previous post on NSIS points to a quick start guide (in Harshani's blog) for NSIS, including how to install NSIS and how to write a simple installer. So at this point you should have installed NSIS and been somewhat familiar with NSIS scripting (sections, etc..). So here I am posting the piece of script I used to detect whether Java is installed in the system.

Section "find java" FINDJAVA

  StrCpy $1 "SOFTWARE\JavaSoft\Java Runtime Environment"
  StrCpy $2 0
  ReadRegStr $2 HKLM "$1" "CurrentVersion"
  StrCmp $2 "" DetectTry2
  ReadRegStr $5 HKLM "$1\$2" "JavaHome"
  StrCmp $5 "" DetectTry2
  goto done

  DetectTry2:
  ReadRegStr $2 HKLM "SOFTWARE\JavaSoft\Java Development Kit" "CurrentVersion"
  StrCmp $2 "" NoJava
  ReadRegStr $5 HKLM "SOFTWARE\JavaSoft\Java Development Kit\$2" "JavaHome"
  StrCmp $5 "" NoJava done

  done:
  ;All done. 

  NoJava:
  ;Write the script to install Java here

SectionEnd


In 3rd line of the script, it copies the path "Software\JavaSoft\Java Runtime Environment" to the variable 1. It is the Windows registry entry in which we should look for Java. In line 5 it reads the value of registry attribute "Current Version" which belongs to "SOFRWARE\JavaSoft\Java Runtime Environment", to the variable 2. ReadRegStr is the command used to read the registry. Here, "HKLM" means that it should look for this key under "HKEY_LOCAL_MACHINE" registry main key. 

In line 6 the command StrCmp compares the value of var 2 with "empty". If it is empty then that means there is no JRE installed in the system. So it passes the control to label "DetectTry2" which tries to detect if there is any Jdk installed. Line 7 is executed only if there is a value for JRE version. If so it tries to find the value for JavaHome attribute in key "Software\JavaSoft\Java Runtime Environment\1.x.x". In line 8 it checks whether JavaHome is null and if so, then again it jumps to label "DetectTry2". If it is not null that means there is a JRE installed and line 9 passes it to label "done".

Now let's see what "DetectTry2" label does. It is executed only if there is no JRE installed. In line 12 it reads the value of  "CurrentVersion" attribute of key "SOFTWARE\JavaSoft\Java Development Kit". In line 13 it checks whether the value it got is empty. If so it will hit the label "NoJava" means that neither JRE nor JDK is installed. If it is not empty then line 14 will check whether JavaHome is empty like before. Again, if JavaHome is empty it jumps to "NoJava". If not it jumps to "done".

If we ever hit "done" then that means either JRE or JDK is installed in the system. So there is nothing to do there. If we hit NoJava then we are going to install Java. I will post the script for that in a later post, NSIS - How to embed some other installer in your own installer.

This is valid for any other software like .NET framework, MS Office, etc as long as you know the correct registry entries to look in. 

Friday, April 15, 2011

Nullsoft Scriptable Install System (NSIS) - A Really Good Windows Installation System

I wanted to write an installation for IFRI data entry application which is currently being used to enter forest data to their database. The existing installation had some inconsistencies like users had to install the other required software themselves, some permission issues etc. So I had to search for a pretty stable installation system with all those features I wanted.

While searching I found this Harshani's blog about NSIS and thought to give it a try and  decided to write IFRI installer using NSIS. First it was not pretty simple and straight forward. I had to learn NSIS scripting language , tested examples in NSIS site. NSIS documentation was pretty helpful too. So finally I was able to write an installer for IFRI with all the features they expected and NSIS helped me a lot on that. I think it wouldn't be this easy and stable if I used another installation system other than NSIS.

So I'll post some tips and tricks I found  in NSIS scripting later. However Harshani's blog post about NSIS (stated above) is a nice post and shows how to build a simple installer. It will be a good first step on NSIS.

Monday, October 18, 2010

How to Print from Java (JPS) - javax.print Package

javax.print package is available in JDKs 1.4 and above. Formerly Java AWT printing API was used to perform basic printing and now it is enhanced with advanced options like printer service discovery, in javax.print API.

I am posting a simple example showing how to perform a basic print using javax.print API.

import java.io.*;
import javax.print.*;

public class PrintTest {
 public static void main(String[] args) throws IOException {
  //we are going to print "printtest.txt" file which is inside working directory
  File file = new File("printtest.txt");
  InputStream is = new BufferedInputStream(new FileInputStream(file));
  
  //Discover the default print service. If you call PrintServiceLookup.lookupPrintServices
  //then it will return an array of print services available and you can choose a
  //printer from them
  PrintService service = PrintServiceLookup.lookupDefaultPrintService();
  
  //Doc flavor specifies the output format of the file (Mime type + Char encoding)
  //You can retrieve doc flavors supported by the printer, like this
  //DocFlavor [] supportedFlavors = service.getSupportedDocFlavors();
  DocFlavor flavor = DocFlavor.INPUT_STREAM.TEXT_PLAIN_US_ASCII;  
  
  
  // Create the print job
  DocPrintJob job = service.createPrintJob();
  //Create the Doc. You can pass set of attributes(type of PrintRequestAttributeSet) as the 
  //3rd parameter specifying the page setup, orientation, no. of copies, etc instead of null. 
  Doc doc = new SimpleDoc(is, flavor, null);

  //Order to print, (can pass attributes instead of null)
  try {
   job.print(doc, null);
  } catch (PrintException e) {
   e.printStackTrace();
  }  

  //DocPrintJob.print() is not guaranteed to be synchronous. So it's better to wait on completion
  //of the print job before closing the stream. (See the link below)
  is.close();
  System.out.println("Printing done....");
 }

}

This example shows how to create a Print job watcher. You can create an object from PrintJobWatcher in your PrintTest class and call waitForDone() before closing the stream.

You can find documentation on javax.print API here.

The DocFlavor I have used in this example (INPUT_STREAM.TEXT_PLAIN_US_ASCII) wont work on Windows. The PrintService doesn't discover this flavor as a supported one for some reason. Yes, this Java Print Service facility is still buggy (in JDK 1.6). It is weird that we can't print ASCII formatted files while we can print any JPEG or PNG.  I used INPUT_STREAM.AUTOSENSE flavor which uses mime type "application/octet-stream", to print on Windows. Then the printer will print just the octets coming from the stream.However it works fine.

Monday, September 06, 2010

How to Fetch MP3 from YouTube Videos

I found a nice site to fetch mp3s from YouTube videos. The process is pretty simple and fast. Check it out, you'd love it.

Saturday, August 14, 2010

How to Find which Process Runs on which Port in Windows

netstat -ab

shows which process runs on which port. If you need to find a process which runs on a particular port, the command can be used as follows

netstat -ab | find ":8080 "

Tuesday, August 10, 2010

How to Remove Duplicate Records from a Table, Considering a Subset of Columns - Sql

I wanted to delete some duplicate records from a table. "Duplicate" doesn't mean identical records in this scenario. I wanted to check whether the values in a subset of columns are identical and if so, to remove additional records keeping just one record in the table. 

Let's assume we have a table called Person like below

IdNameAgeCity
10Sunil24Matara
11Sandun25Colombo
12Nimali23Matara
13Dilani25Matara
14Savini25Galle

Say we need only one person from one city. Then we have to remove two records having Matara as the city.

To do that we can write a query like below

DELETE FROM Person WHERE Id > (SELECT MIN(Id) FROM Person p where p.City = Person.City)

We used Id as a controller to decide which records to delete and to keep just one record (by checking min Id).

After executing the query, the table will look like this


IdNameAgeCity
10Sunil24Matara
11Sandun25Colombo
14Savini25Galle

Saturday, February 27, 2010

How to merge multiple images into one image - Java ImageIO

My previous post shows how to split an image into chunks. Now let's see how to merge multiple images into one image. Say we need to concatenate following four image chunks. I got these chunks by splitting the image in the right hand side, using the image splitter.


Following code shows how to concatenate the image chunks above into one image.
int rows = 2;   //we assume the no. of rows and cols are known and each chunk has equal width and height
        int cols = 2;
        int chunks = rows * cols;

        int chunkWidth, chunkHeight;
        int type;
        //fetching image files
        File[] imgFiles = new File[chunks];
        for (int i = 0; i < chunks; i++) {
            imgFiles[i] = new File("archi" + i + ".jpg");
        }

       //creating a bufferd image array from image files
        BufferedImage[] buffImages = new BufferedImage[chunks];
        for (int i = 0; i < chunks; i++) {
            buffImages[i] = ImageIO.read(imgFiles[i]);
        }
        type = buffImages[0].getType();
        chunkWidth = buffImages[0].getWidth();
        chunkHeight = buffImages[0].getHeight();

        //Initializing the final image
        BufferedImage finalImg = new BufferedImage(chunkWidth*cols, chunkHeight*rows, type);

        int num = 0;
        for (int i = 0; i < rows; i++) {
            for (int j = 0; j < cols; j++) {
                finalImg.createGraphics().drawImage(buffImages[num], chunkWidth * j, chunkHeight * i, null);
                num++;
            }
        }
        System.out.println("Image concatenated.....");
        ImageIO.write(finalImg, "jpeg", new File("finalImg.jpg"));

Wednesday, February 24, 2010

How to Split an Image into Chunks - Java ImageIO

Image splitting and concatenating and other image manipulation techniques are important in parallel computing. Say we are receiving small chunks of an Image which is being manipulated parallely. In such scenarios, we need to concatenate those chunks together and vice versa.

There is a pretty straight forward way to split an image using Java imageio package. Say you need to split following image into several chunks (you should decide the no. of rows and columns needed).


Now I am going to split this image into 16 chunks (4 rows and 4 columns). I have shown the code snippet below.

import javax.imageio.ImageIO;
import java.awt.image.BufferedImage;
import java.io.*;
import java.awt.*;

public class ImageSplitTest {
    public static void main(String[] args) throws IOException {

        File file = new File("bear.jpg"); // I have bear.jpg in my working directory
        FileInputStream fis = new FileInputStream(file);
        BufferedImage image = ImageIO.read(fis); //reading the image file

        int rows = 4; //You should decide the values for rows and cols variables
        int cols = 4;
        int chunks = rows * cols;

        int chunkWidth = image.getWidth() / cols; // determines the chunk width and height
        int chunkHeight = image.getHeight() / rows;
        int count = 0;
        BufferedImage imgs[] = new BufferedImage[chunks]; //Image array to hold image chunks
        for (int x = 0; x < rows; x++) {
            for (int y = 0; y < cols; y++) {
                //Initialize the image array with image chunks
                imgs[count] = new BufferedImage(chunkWidth, chunkHeight, image.getType());

                // draws the image chunk
                Graphics2D gr = imgs[count++].createGraphics();
                gr.drawImage(image, 0, 0, chunkWidth, chunkHeight, chunkWidth * y, chunkHeight * x, chunkWidth * y + chunkWidth, chunkHeight * x + chunkHeight, null);
                gr.dispose();
            }
        }
        System.out.println("Splitting done");

        //writing mini images into image files
        for (int i = 0; i < imgs.length; i++) {
            ImageIO.write(imgs[i], "jpg", new File("img" + i + ".jpg"));
        }
        System.out.println("Mini images created");
    }
}

 Parameter list of "drawImage()" (See line 28)
--   image - The source image
--   0, 0  - X,Y coordinates of the 1st corner of destination image
--   chunkWidth, chunkHeight - X,Y coordinates of the opposite corner of destination image 
--   chunkWidth * y, chunkHeight * x - X,Y coordinates of the 1st corner of source image block
--   chunkWidth * y + chunkWidth, chunkHeight * x + chunkHeight - X,Y coordinates of 
             the opposite corner of source image block

Now you'll see 16 image chunks formed in your working directory.


Tuesday, January 12, 2010

How to Write a Custom Class Loader to Load Classes from a Jar

A custom class loader is needed when the developer needs to load classes from some custom repositories, to implement hot deployment features and to allow unloading of classes.

According to Java2 class loading system, a custom class loader should subclass java.lang.ClassLoader and overrride findClass() method which is responsible for loading the class bytes and returning a defined class.

Following code is a custom class loader which loads classes from jars, inside the directory called "jar".

public class JarClassLoader extends ClassLoader {
    private String jarFile = "jar/test.jar"; //Path to the jar file
    private Hashtable classes = new Hashtable(); //used to cache already defined classes

    public JarClassLoader() {
        super(JarClassLoader.class.getClassLoader()); //calls the parent class loader's constructor
    }

    public Class loadClass(String className) throws ClassNotFoundException {
        return findClass(className);
    }

    public Class findClass(String className) {
        byte classByte[];
        Class result = null;

        result = (Class) classes.get(className); //checks in cached classes
        if (result != null) {
            return result;
        }

        try {
            return findSystemClass(className);
        } catch (Exception e) {
        }

        try {
            JarFile jar = new JarFile(jarFile);
            JarEntry entry = jar.getJarEntry(className + ".class");
            InputStream is = jar.getInputStream(entry);
            ByteArrayOutputStream byteStream = new ByteArrayOutputStream();
            int nextValue = is.read();
            while (-1 != nextValue) {
                byteStream.write(nextValue);
                nextValue = is.read();
            }

            classByte = byteStream.toByteArray();
            result = defineClass(className, classByte, 0, classByte.length, null);
            classes.put(className, result);
            return result;
        } catch (Exception e) {
            return null;
        }
    }

}

This code can be improved to
* Load classes from any jar inside the directory
* Dynamically pick up classes if the jar is updated (by keeping a modified time field)

Monday, November 09, 2009

Code Plugin for Blogger - How to Install Syntaxhighlighter

I found a nice blog post explaining how to install Syntaxhighlighter code plugin to blogger. It is very simple and works great.

Some additions
1. If your browser is Firefox, you should add the styles manually
    * copy the stylesheet at the location http://syntaxhighlighter.googlecode.com/svn/trunk/Styles/SyntaxHighlighter.css
    * Go to Layout --> Edit HTML
    * Paste the stylesheet before ]]> tag
    * Save the template

2. Other relevant scripts (Other than Cpp) are located here

Wednesday, November 04, 2009

How to Plot Moving Graphs Using Flot Library

Plotting a moving graph is nothing other than plotting an instance of a varying data set at each refresh. However, to get the moving effect you need to change the data set as stated below

1. Discard the leftmost Y value of the previous step
2. Shift the remaining Y values to the left
3. Add the new coming value as the rightmost Y value
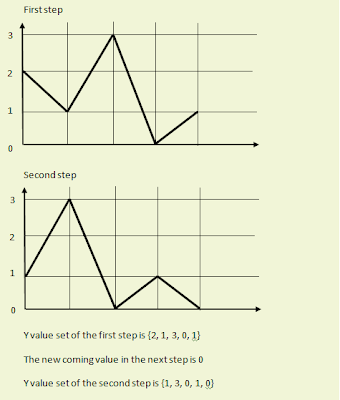


Flot is an opensource Javascript plotting library for jQuery. Now let's see how to do this using Flot.

Firs you need to download flot library and add followings to your js folder.
1.jquery.js
2.jquery.flot.js
3.excanvas.js (This is needed if your browser is IE)

Now let's create the html page

<html>
<head>
    <!--Include the css file and flot libs-->
    <LINK REL=StyleSheet HREF="css/layout.css" TYPE="text/css">

    <script language="javascript" type="text/javascript" src="js/jquery.js"></script>
    <script language="javascript" type="text/javascript" src="js/jquery.flot.js"></script>
    <script language="javascript" type="text/javascript" src="js/excanvas.js"></script>
    ....
    ....                                                                 
    .... 

Here is the CSS file used

body {
  font-family: sans-serif;
  font-size: 16px;
  margin: 50px;
  max-width: 800px;
  background-color:#000000;
}

div.graph {
    width:500px;
    height:300px;
} 

Let's include javascript functions inside HEAD

....
....
<script id="source" language="javascript" type="text/javascript">
        var running = false;
        var array;
        var xscale = 100; 

        //this function does the plotting 
        function draw() {
           //shift the values to left
            for (var i = 0; i < this.xscale - 1; i++) {
                this.array[i] = [i,this.array[i + 1][1]];  // (x,y)
            }

            //add the new coming value to the last postion
            this.array[this.xscale - 1] = [this.xscale - 1,Math.random()];

                $.plot($("#graphdiv"), [
                    {
                        label: "Y vs X",
                        data: this.array,
                        lines: { show: true, fill: true, fillColor: "rgba(249, 28, 61,0.3)",lineWidth: 3.5 },
                        color:"rgba(249, 28, 61,1)"
                    }
                ],
                {
                    xaxis: {
                        ticks: generateTicks(),
                        min: 0

                    },
                    yaxis: {
                        ticks: [0 , 0.2, 0.4, 0.6, 0.8, 1.0, 1.2],
                        min: 0
                    },
                    
                    //placing a grid
                    grid: {
                        show: true,
                        color: '#474747',
                        tickColor: '#474747',
                        borderWidth: 1,
                        autoHighlight: true,
                        mouseActiveRadius: 2
                      }


                });
        }


        //This creates the data array with 0.0 inital Y values at the initialization time
        function initialize() {
            this.array = new Array();
            for (var i = 0; i < xscale; i++) {
                this.array[i] = [i, 0.0];
            }
        }

        //This is used to generate ticks for X axis (value 0 will be on the right)
        function generateTicks() {
            var tickArray = [];
            var startTick = 20;
            var i = startTick - 1;
            var weight = this.xscale / 20;
            do {
                var t = (startTick - i) * weight - 1;
                var v = i * weight;
                if (v == 0) {
                    v = "0";
                }
                tickArray.push([t, v]);
                i--;
            } while (i > -1);
            return tickArray;
        }

        //This function is called once per every 1000ms
        function refreshStat() {
            if (!running) {
                running = true;
                draw();
                running = false;
            }
        }

        $(document).ready(function () {
            initialize();
            refreshStat();
            setInterval("refreshStat()", 1000);
        });

    </script>
</head>

Now here goes the BODY of the html

<body>
<table cellspacing="50">
    <tr>
        <td>
            <div id="graphdiv" class="graph"></div>
        </td>
    </tr>
</table>
</body>
</html>

Then you'll get a moving graph. I've posted some still instances of the graph below


You can customize the graphs as your wish. Flot API will help you on that. This is pretty simple and straight. Just give a try.

Tuesday, June 16, 2009

Abdera Client - Using teardown()

I was working on a program which makes several requests to Abdera back end from the client. The client was designed to use a new AbderaClient per request and teardown method was not used on AbderaClient instance after using.

This led to an exception when I run it concurrently (by using about 100 threads). AbderaClient uses HTTPClient and MultiThreadedHttpConnectionManager. Teardown method is the one who shuts down this connection manager and the best practice is to call teardown after using AbderaClient instance.
AbderaClient abderaClient = new AbderaClient(new Abdera());
// make the call
abderaClient.teardown();

Sharing a single instance of AbderaClient among all request is another option but some times it goes to a deadlock state (keeping a connection open for a long time is not recommended anyway).

Saturday, February 28, 2009

Midi to Mp3 Converter

Here is a cool midi to mp3 converter which is so simple and user friendly.

Direct MIDI to MP3 Converter 5.0

Wednesday, February 18, 2009

Making Good SOA Great - WSO2 Carbon

WSO2 Carbon is the industry's first fully componentized SOA platform. It is built on OSGi. Other WSO2 products such as WSO2Registry, WSO2 Enterprise Service Bus (ESB), WSO2 Web Services Application Server (WSAS) and WSO2 Business Process Server (BPS) are Carbon based.

Why Carbon? This e book says it all.

Tuesday, February 10, 2009

WSO2 Registry 2.0 Released

WSO2 Registry is a user friendly resource management solution available under Apache2 license. The new release of WSO2Registry is based on WSO2Carbon, which is meant to be the first fully componentized SOA framework in the industry.

As the new release of WSO2Registry is based on Carbon, it uses a unified GUI which supports other carbon components too. Another new feature included to the 2.0 release is Registry's web services API. As Registry has exposed the API methods as web services, the Registry API can be remotely accessed through web services.

Apart from these the new release includes many useful features and a considerable performance improvement.

Wednesday, January 28, 2009

IE6 Doesn't Support application/atom+xml Mime Type

Internet Explorer 6 is having a problem with displaying atom feed documents which's mime type is "application/atom+xml". The browser attempts to download the file instead of rendering it. Simply this happens because browser does not accept or recognize the mime type.

A simple hack can be done to avoid this issue from the server side. That is changing the mime type to appication/xml or text/plain, only if the user agent is IE6 in the HTTP header. Changing the mime type will not fix the problem but at least the browser will display the raw XML content.

The back end application or the server can be configured to send the correct mime type to the relevant browser by looking at the User-Agent header in the HTTP request.

Saturday, November 01, 2008

How to Replace Strings in Java - Using java.util.regex package

Replacing a charater in a String is just a matter of adding a one line to the code.

originalString.replace(oldChar, newChar)

ex.
String originalString = "This/is/my/string";
System.out.println(originalString.replace('/', '|'));
Then the output will be "This|is|my|string"


Anyway how can we replace a character or number of characters(a substring) with another string. This can be done using the regex package in Java.


If we need to replace "my" with "your" we can do it in the following way.
import java.util.regex.*;  

String originalString = "This is my string";
Pattern pat = Pattern.compile("my"); 
Matcher mat = pat.matcher(originalString);
System.out.println(mat.replaceAll("your")); 
mat.reset();
The output will be "This is your string"
Related Posts with Thumbnails